 Erica Sadun is at it again with a completely amazing app! Findme is just a script that runs in the background and print the lat/long of your location. But when combined with Twitter (a buddy tracking web application) findme becomes one of the coolest iPhone hacks yet! Before I explain the whole hack, check out the end result on my twitter twitter.com/JakesiPhone
The first great use of this I thought of, is my trip to Italy this summer. I can give my Twitter URL to family and friends so they can see my progress through the country. But the intended use is to set up your Twitter as a private account, so only you can check it. Then if you iPhone ever gets stolen, you can see where its at! Which has potential in the future to be so much more. The script could be modified to take a photo and record the location, so you could possibly get a picture your thief caught red handed! That is of course my pipe dream, but the ability is there. Just need some one to develop it.
Check out the Hack after the break.
The Hack
JUST IN!! – Shai commented:
This is available in installer via my source http://ride4.org/shai.xml
I’m currently working on making sure it runs in the background.
Its called Quasi Low jack under utilities
The installer package installs everything for you, you just have to go in and edit the ‘tweet’ file and add your username! At this time the ‘pingwifi’ trick has not been added to his package. Check below for this addition to make findme run when the iPhone is asleep! Thanks Shai!
WARNING: this is an advanced hack. Only those who deem themselves capable should attempt this. And I nor anyone at AppleiPhoneSchool.com can take responsibility for any damages that may occur to you or your iPhone while attempting this. :P
Prereqs: You must have a Jailbroken 1.1.3 iPhone (with working Googlemaps Locations feature) and BSD Subsystems installed. You can find the most recent version in Installer. (2.1 I believe). You Now need to create a Twitter account. You can do that here. If you want your location to be private then you MUST create a new account even if you already have one! Once you have an account created, goto the Twitter settings and select “Protect my updates” and save. Now your account is private, so only you and people you select to share with can see the location info. Now onto the fun stuff…
1 – Go get ‘findme’ from Erica’s page here and save it on your desktop. Note: downloading this with Safari has reportedly caused errors. I can vouch that FireFox does download this correctly.
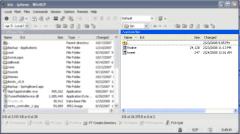
2 – SSH into your iPhone using WinSCP, or the OSX equivalent, and navigate to the /var/root directory. Here you need to add a new directory “bin” (all lowercase!) and go into it. You should be at /var/root/bin. Now drag and drop findme into this folder. Change the permissions to 0755, that is done with right-click>properties on WinSCP.
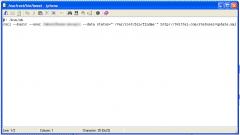
3 – Now right click inside the bin folder and New>create new file. Name this file “tweet” and open it up to edit it. If you are using an App besides WinSCP, in this step you are just creating a new text file, without the .txt, naming it “tweet” and placing it in the bin folder we created. Now that you have the file “tweet” open and ready to edit (there should be nothing inside the tweet file at this time), add the following 2 lines. (No more than 2 lines!)
#! /bin/sh

curl --basic --user username:password --data status="`/var/root/bin/findme`" http://twitter.com/statuses/update.xml

curl --basic --user username:password --data status="`/var/root/bin/findme`" http://twitter.com/statuses/update.xml
Since my lines are probably wrapping, the first line should start with “#! /bin… ” The second line should start with “curl… ” Now go into this code and replace the username and password with your Twitter Login info. Caps do matter, so make sure it is an exact match!
I have provided screenshots at the end, so you can double check everything to match!
Save it, and make sure you did place it into /var/root/bin.
4 – Now the even trickier part! To make this run on its own, we have to create a LaunchDaemon. If you are not 100% sure you know what you are doing, turn back now! Making a mistake here may require a full restore to get your iPhone working again! With that said, I did not have problems completing this, and I am by no means a programmer of any sort.
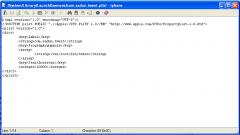
With WinSCP, or equivalent, navigate to /System/Library/LaunchDaemons. Here you will see a whole bunch of .plist files. The one we want is “com.apple.daily.plist”. Make a copy of com.apple.daily.plist and name it “com.sadun.tweet.plist” Now open it up so we can edit com.sadun.tweet.plist. Here are the changes recommended by Erica, and below that I’ll show you exactly what mine looks like.
* Update the Label to com.sadun.tweet.
* Kill the two lines that relate to “nice”. You don’t want your lojack to be usurped by other processes.
* Change the program arguments to /var/root/bin/tweet.
* Change the start interval from 86400, according to your needs. 86400 is once a day (60 seconds * 60 minute * 24 hours). Right now, I have mine running every ten minutes (600) because I needed to check that the LaunchDaemon was functioning properly. (it is rumored that a interval of less than 120 (1 minute) will not work)
Mine looks like, set to update every 3 hours:
Note: the stuff at the top will probably text wrap on this blog, but you don’t need to edit it, so leave that part the way it is.
Save the changes, then again edit the permissions on tis file to 0755. Then double check that /System/Library/LaunchDaemons/com.sadun.tweet.plist is saved in the correct place that that there is no typos. One misspelling or wrong capitalization will make this not work.
Power down your iPhone and restart it. Then restart it again, for good measure.
That is everything. If you followed this guide word for word, letter for letter. Everything is now setup and running. If you set your LaunchDaemon to 10800 (3 hours) your first tweet will go in 3 hours.
The Trick to make it run while the iPhone is asleep!
Quoted right from Erica Sadun:
“As for running, it does run, even when the phone is in standby–but if wifi isn’t enabled, nothing much happens.
I uploaded a modded version of pingwifi to the TUAW folder. At the beginning of your tweet script, just run it and wait 10 seconds
/var/root/bin/pingwifi; sleep 10
and it will force wifi on and then try to report in.”
So basically, go back to here and get ‘pingwifi’, drop it into the /var/root/bin folder
then add this script to the very top of your ‘tweet’ file (this makes that file 3 lines long now):
/var/root/bin/pingwifi; sleep 10
Now to check that everything is working correctly.
SSH into your iPhone with command line access, PuTTy on windows. Navigate to the bin folder by
typing: cd /var/root/bin,
Type: ls – you should see ‘findme’ and ‘tweet’ listed.
Type: findme – it should spit out long/lat data and a Google link.
Type: tweet – this will spit out some XML data, like 10-15 lines. If something didn’t work it will say something like ‘directory not found’ that means you didn’t set permissions correctly on the 3 files we added. If you did get a XML data output, that means you just successfully posted your location to your Twitter account. Congrats! Go refresh your Twitter page to see the entry.
Now to make sure that the com.sadun.tweet.plist file (the one that automatically posts the info based on the interval you set) has run correctly, you must wait and see if it post to your Twitter, after the time amount you set. If you check later and it didn’t post, go back to com.sadun.tweet.com and double check everything was entered correctly. You can even copy and paste my code above into it and try that.
Please post any reasonable questions here, or check the thread on the original post on TUAW for answers.


Wow, she comes up with amazing apps. That is so neat. Going to be installing that later.
I believe this will help if you want to stop the tracking for a period of time:
Use utctl and stop com.sadun.tweet
then to start:
Use utctl and start com.sadun.tweet
this is available in installer via my source http://ride4.org/shai.xml
I’m currently working on making sure it runs in the background.
Its called Quasi Low jack under utilities
This is a fan update to Ericas findme, and has been edited fromteh first version she put out. Her new version adds the pindrop feature that the one from your source adds. As Erica is the developer, I would strognly recommend getter her version, rather that a hacked version. But I will leave your link up, as people may prefer the easy route of Installer.
I do assume though that your install does not automatically add the launchdaemon, or tweet code?
Whenever i try to install it through installer it says “Error: Unable to decode package more info at http://www.hackthatifone.com/forum/index.php?topic-49.0“
Erica has updated her findme, it now has better location finding, and pindrop on google maps.
@jacob it seems this does not work if my iphone screen is not powered on
I have a fix for that!
Erica wrote:
This drops a pin but the big change is in accuracy.
As for running, it does run, even when the phone is in standby–but if wifi isn’t enabled, nothing much happens.
I uploaded a modded version of pingwifi to the TUAW folder. At the beginning of your tweet script, just run it and wait 10 seconds
e.g. /var/root/bin/pingwifi; sleep 10
and it will force wifi on and then try to report in.
Thank you jacob. That pingwifi sometimes works. At the moment it is included in my installer package however it doesnt work reliably.
This is NOT a hacked version.
As you can se by erica’s comment’s she helpped me along the way:
http://ericasadun.com/?p=179#comment-1736
It is her original files. It installs/sets up everything according to her instructions. v 2.1 on my source does contain the newest findme that includes the pindrop and much better accuracy. The package on installer does everthing aside from setting your username and password in the tweet file. The user still needs to go in and change their username and password.
Again, this is not a hacked version, but rather an installer package that I put together to help people out setting this up. Thats all
Awesome! I stand corrected, I will try this out later to confirm, but I have read through your convorsation with Erica and I already believe that this will work just fine!
So when you say that you are working to make it run in the background, I assume you mean you are adding pingwifi to your installer package and the tweet script?
Thank you for the reply Jacob.
The only part I have to figure out is how to make sure the daemon runs while the phones asleep. This doesnt seem too hard as the mail checking daemon runs fine
I think it should be easy to add pingwifi to your install, and just edit the tweet script? correct?
Thats exactly what I did. However Its still not running in the background. v2.1 on my source includes the pingwifi and the tweet file that runs pingwife waits 10 seconds then runs findme and updates twitter.
I think again the problem is the com.sadun.tweet.plist doesnt run when the phones in sleep mode. At least not ATM as my phones sleeping and theres no updates on twitter. about 20 seconds after I slide to unlock, BAM theres an update on twitter.
I have heard that adding the entry to the CRON job will make it run while asleep. But I wouldnt know how to edit that through installer, nor have I tried that myself.
@shai when I use your installer app, I get lat (null) lon (null)
Sometimes this will happen. Thats a known bug, you can double up the tweet script but its not recomended. That null bug is uncommon though and only happens once in a while
Is your wifi active?
@jacob yes
jk111 are you in the Bermuda Triangle? That may explain you null lat and lon values. I see references to WiFi alot, this does work over EDGE/GPRS, right.
yes in my experience. Although I have heard reports that its not consistant
hmm.. I am at work atm, and have 1 bar with edge. Slowly I am updating my sources and should get this installed soon. I will report back what I find.
I am just running the findme from Tapp.app and gotten 3 null/null’s in a row. I am on a very weak edge signal atm, but it is there, going outside to try it out.
I went outside, with full bars on edge. and got null/null 5 times. :-/
hey, it keeps saying in putty that my username and password is unknown…??? and one more thing how do you check your updates on twitter thanks p.s. i also checked the file permissions those are fine..
login to your twitter to check your updates.
Not sure why putty isnt letting you in.
mobile/alpine is the login/pw, or sometimes root/alpine
BTW: I downgraded to the original findme, and it is working just fine!
hey jacob thanks for the info but i found it out but i go to twitter and then check my updates then click the google maps link and it loads google maps and it just stAYS THERE it doesnt show my location?//?????
Its working for me … kinda .. my twitter says my lat and long is “null”?
Any ideas?
UPDATE: to the NULL ERROR The new version included inthe installer doesnt work.. I dont know why as of yet but if you SSH into your phone and replace with the old findme. It works fine.
Findme-better seems to be working again. Must have been a block on Skyhosts part that is now resolved.
Is just install via installer by http://ride4.org/shai.xml, register on twitter and edit ‘tweet’ to add your username and password?
Thanks!
i can’t make it work please help me im runing 1.1.3 and i install from ride4 i put my twitter username and password but is not working
When mine updates it just says where i am on my twitter in longitude and latitude. How do you add the link to google maps?
Nevermind, i installed the one from shai’s source and now it works. This is great! I love it!
I did it all manual at first, then when I SSH’d to my iPhone, I did /var/root/bin, then I did ls, still all fine, after that findme, that also worked fine, but if I runt he command tweet, then it says “could not authenticate you”. Any idea why it is doing this? I set up a new account at Twitter, and logged in and out several times. I’m sure I entered the correct username/password. I even tried Shai’s app, and then edited the tweet file. Nothing worked, it keeps saying “could not authenticate you”..
Thanks a lot for this. I was just wondering if there is some way to make curl work with https:// (ssl) for security purposes. I tried just changing it to https in the script, but it failed.
Seriously, great job
Ok. Does it work with 1.1.4 ? And is there a newer version of it with a login interface so no SSH is needed? And what is the version and source ? Pls reply to comment.
what folder do i put findme in? (1.1.4)